#angular 7 reactive forms crud example
Explore tagged Tumblr posts
Visit Tumblr Blog
Explore Tumblr blogs with no restrictions, modern design and the best experience.
Last Seen Tumblr Blogs


Fun Fact
In 2020, 44% of users from Denmark used Tumblr daily.
Text
Angular 7 Reactive – Form Validation Simple Example
Every application requires user input and the input must be correct that is the developer’s responsibility. Angular 7 comes with the form validation feature.
Today we will learn about the validation of the 7 Angles form.
So let’s start with a simple registration form validation. We need a 7 Corner project. If you don’t know how to create an Angular project 7. Follow this tutorial.
Register the…
View On WordPress
#angular 7 reactive form checkbox example#angular 7 reactive form example#angular 7 reactive form validation#angular 7 reactive form valuechanges#angular 7 reactive forms#angular 7 reactive forms crud example#angular 7 reactive forms custom validation#angular 7 reactive forms file upload#angular 7 reactive forms tutorial#angular 7 reactive forms two way binding
0 notes
Text
Angular 7 - CRUD Operations
This is very huge post which covers most of the angular concepts , so please be patient and go through it. This post is related to angular CRUD operations using angular AG grid and REST webservices in java. We will go through below concepts while going through these post - REST API in javaAG Grid in javaBootstrap Configuration Notifications service configurationReactive forms in angularForm ValidationsService in angularCalling REST API using HttpClientRouting and Navigation 1.REST API in java We would need to create a REST API which supports CRUD operations on user data as below - package com.myjavablog.controller; import com.myjavablog.entity.User; import com.myjavablog.repository.UserRepository; import org.springframework.beans.factory.annotation.Autowired; import org.springframework.web.bind.annotation.*; import java.util.List; import java.util.Optional; @CrossOrigin @RestController @RequestMapping("/api") public class UserController { @Autowired private UserRepository userRepository; @GetMapping("/users") public List getUsers(){ return userRepository.findAll(); } @GetMapping("/user/{id}") public Optional getUser(@PathVariable Long id){ return userRepository.findById(id); } @DeleteMapping("/user/{id}") public boolean deleteUser(@PathVariable Long id){ userRepository.deleteById(id); return true; } @PostMapping("/user") public User createUser(@RequestBody User user){ return userRepository.save(user); } @PutMapping("/user") public User updateUser(@RequestBody User user){ return userRepository.save(user); } } This is the controller in java which supports GET,UPDATE,PUT,POST operations on USER data. You can download the entire code from below Github link - Download 2. AG Grid in java Before actually going into angular project, you can go through my older posts on how to create angular project. http://www.myjavablog.com/2019/04/13/angular-installation-and-setup/ Once the project is created you need to install ag-grid support to it. Below packages needs to be installed for the same - npm i --save ag-grid You need to import this dependency in app.module.ts by adding below line under imports - AgGridModule.withComponents(null) Also you need to add CSS support for grid in styles.css - @import 'ag-grid-community/dist/styles/ag-grid.css'; @import 'ag-grid-community/dist/styles/ag-theme-blue.css Then create a component using below command - ng n c user This will create new user component and create CSS, TS , html files. Add code to html file for grid -
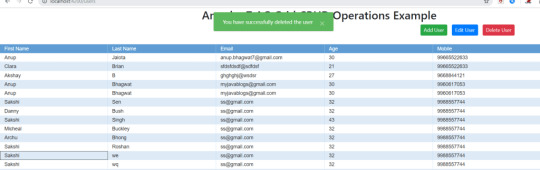
Angular 7 AG Grid CRUD Operations Example
Add User Edit User Delete User All the options specified in grid configuration are self explanatory. You also need Typescript file in order to perform CRUD operations . You get this from my github link. 3. Bootstrap Configuration First install bootstrap by using below npm command - npm install bootstrap Then Add bootstrap to angular.json under styles- "styles": , 4. Notifications service configuration This service is to show the notifications to users. Use below npm command to install - npm install angular-notifier Add it into imports in app.module.ts and add custom options as well- NotifierModule.withConfig( customNotifierOptions ) /** * Custom angular notifier options */ const customNotifierOptions: NotifierOptions = { position: { horizontal: { position: 'middle', distance: 12 }, vertical: { position: 'top', distance: 12, gap: 10 } }, theme: 'material', behaviour: { autoHide: 5000, onClick: false, onMouseover: 'pauseAutoHide', showDismissButton: true, stacking: 4 }, animations: { enabled: true, show: { preset: 'slide', speed: 300, easing: 'ease' }, hide: { preset: 'fade', speed: 300, easing: 'ease', offset: 50 }, shift: { speed: 300, easing: 'ease' }, overlap: 150 } }; Also you would need to add CSS for notifier in app.component.html file as below - 5. Reactive forms in angular Now you need to create user form to add users -
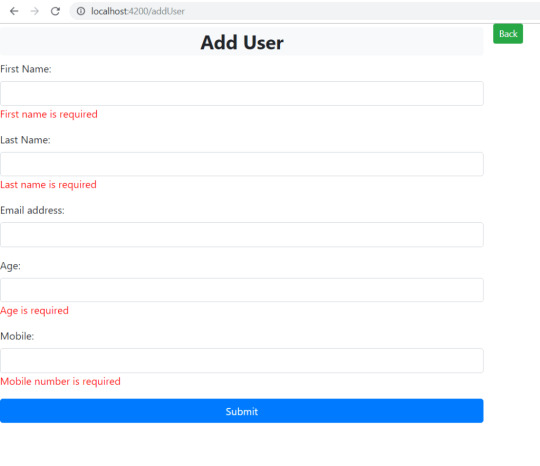
Add User
First Name: First name is required Last Name: Last name is required Email address: Email is required Age: Age is required Mobile: Mobile number is required Submit Invalid credentials. Back 6. Form Validations With reactive forms ,you can associate FormGroup and FormBuilder and access the form fields . Using these objects , you can also validate the form fields using angular Validators. 7. Services in Angular We have to write the service to call the REST APIs and perform CRUD operations as below - Create service using - ng g s user import { Injectable } from '@angular/core'; import { User } from './../model/user'; import {HttpClient} from '@angular/common/http'; @Injectable({ providedIn: 'root' }) export class UserService { apiUrl:string = "http://localhost:8081/api/"; constructor(private http : HttpClient) { } getUsers() { return this.http.get(this.apiUrl+'users'); } deleteUser(userId: number){ return this.http.delete(this.apiUrl+'user/'+userId); } addUser(user: User){ console.log(user); return this.http.post(this.apiUrl+ 'user/', user ); } editUser(user: User){ console.log(user); return this.http.put(this.apiUrl+ 'user/', user ); } } 8. Calling REST API using HttpClient In above service, we are injecting HttpClient in constructor to call the REST API. 9. Routing and Navigation We would need to provide routing for our application. So specific URI will be served by specific Component. Route configuration is provided in app-routing.module.ts as below - import { NgModule } from '@angular/core'; import { Routes, RouterModule } from '@angular/router'; import { LoginComponent } from './components/login/login.component'; import { UserComponent } from './components/user/user.component'; import { AddUserComponent } from './components/user/add-user/add-user.component'; const routes: Routes = ; @NgModule({ imports: , exports: }) export class AppRoutingModule { } You can download the code for this application from below github link - Download Now build the application and serve it to the client - ng build ng serve Now the application is ready to access on http://localhost:4200/-
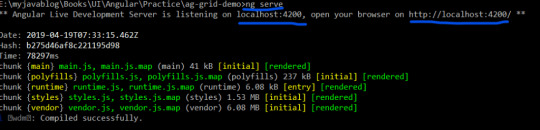
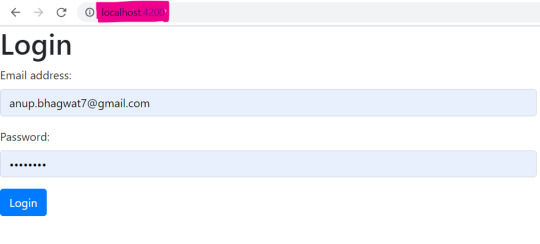
Login screen
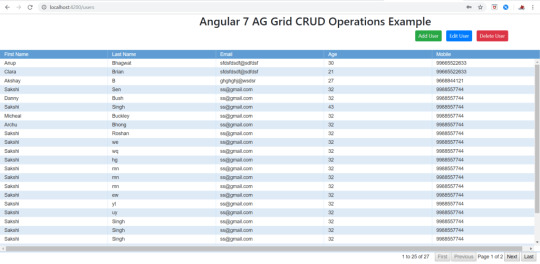
Angular ag grid showing all users
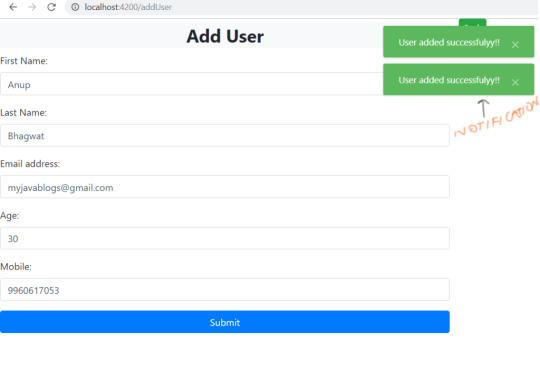
Add New User

User Editing

Updated last name and email
User Deleted
Form Validations Read the full article
0 notes
Text
CRUD Operations using primeng datatable and Material Design
In this post , we are going to use PrimeNG which provides rich set of open source native Angular UI components and Angular Material Design components. Using these two UI libraries , we will built a application to perform CRUD operations. Code for this example can be downloaded from below links - Front End Code - Download Backend Code - Download Step 1: Install primeng https://www.primefaces.org/primeng/#/setup This package provides us lot of inbuilt UI components to design the User interface as per our requirements. We have created CustomPrimengModule which will have all the primeng components dependencies defined in it. We are using these primeng modules by importing CustomPrimengModule in main app module i.e. aap.module.ts file. Step 2: Install Angular material https://material.angular.io/guide/getting-started Angular Material is a UI component library forAngular JS developers by google. Angular Material components help in constructing attractive, consistent, and functional web pages and web applications while adhering to modern web design principles like browser portability, device independence, and graceful degradation. I have created CustomMaterialModule which will have all the material components dependencies defined in it. We are using these primeng modules by importing CustomMaterialModule in main app module i.e. aap.module.ts file. Also we need to make one entry for importing styles for material design theme - @import "../node_modules/@angular/material/prebuilt-themes/deeppurple-amber.css"; Step 3: Define Reactive forms module I have also defined ReactiveFormsModule and AppRoutingModule which are required for creating forms and routing. Step 4: Install App notifications Module https://www.npmjs.com/package/angular-notifier We are also using NotifierModule to show the notifications in application. For this , we need to import NotifierModule in app.module.ts. Also we need to make one entry for importing styles for notifications - @import "~angular-notifier/styles"; Step 5 : Create the components/Services/Models required for application Components: ng g c components/todo --main=app ng g c components/todo-add --main=app ng g c components/todo-edit --main=app Services: ng g s services/todo Model: Create a typescript file Todo.ts Step 6: Write the component to perform CRUD operations src\app\components\todo\todo.component.html - This is the view part which displays primeng data table providing features for sorting, pagination,inline row editing, Delete, Add row etc. List of Todo Tasks {{col.header}}
{{todo.name}}
{{todo.desc}}
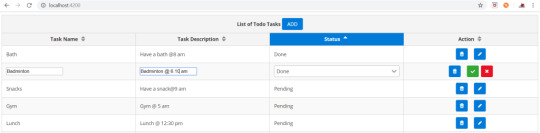
{{todo.status}} There are {{todos?.length}} todo tasks src\app\components\todo\todo.component.ts - This is a typescript file which has implementation for CRUD operations on primeng datatable. It uses TodoService to perform CRUD operations on data using REST webservice - import { Component, OnInit } from '@angular/core'; import { TodoService } from 'src/app/services/todo.service'; import { Router } from '@angular/router'; import { map, catchError, tap, retry } from 'rxjs/operators'; import { NotifierService } from 'angular-notifier'; import { Todo } from 'src/app/domain/Todo'; import { SelectItem } from 'primeng/primeng'; @Component({ selector: 'todo-list', templateUrl: './todo.component.html', styleUrls: }) export class TodoComponent implements OnInit { cols: any; todos: Todo; displayedColumns: string = ; displayTodoList = true; displayTodoAdd = false; displayTodoEdit = false; constructor(private todoService: TodoService, private router: Router, private notifier: NotifierService) { } ngOnInit() { this.displayTodoList = true; this.displayTodoAdd = false; this.displayTodoEdit = false; console.log("From Init = " + this.displayTodoList + " " + this.displayTodoAdd); this.getTodoList().subscribe((data) => { this.todos = data }); this.cols = ; this.statusValues = ; } // To Get List Of Todos getTodoList() { return this.todoService.getTodoList(); } // To Get Todo getTodo(todoId) { return this.todoService.getTodo(todoId); } // To Edit Todo editTodo(todoId) { this.displayTodoList = false; this.displayTodoEdit = true; this.router.navigate(); } //Delete Todo deleteTodo(todoId) { console.log("Delete id" + todoId); this.todoService.deleteTodo(todoId).subscribe((data) => { console.log("success"); this.notifier.notify("success", "Task deleted successfully!!"); }); this.ngOnInit(); this.router.navigate(); } //add Todo addTodo() { console.log("Before = " + this.displayTodoList + " " + this.displayTodoAdd); this.displayTodoList = false; this.displayTodoAdd = true; console.log("After =" + this.displayTodoList + " " + this.displayTodoAdd); } hideTodoAdd(event) { console.log("Event emiited " + event); this.displayTodoList = true; this.displayTodoAdd = event; } clonedTodos: { : Todo; } = {}; statusValues: SelectItem; onRowEditInit(todo: Todo) { this.clonedTodos = { ...todo }; } onRowEditSave(todo: Todo) { this.todoService.updateTodo(todo.id, todo).subscribe((data) => { console.log("success"); this.notifier.notify("success", "Task updated successfully!!"); }); } onRowEditCancel(todo: Todo, index: number) { this.todos = this.clonedTodos; delete this.clonedTodos; } } Step 7: Service Layer - We have injected TodoService through constructor and used it to perform CRUD operations .This service has GET,POST,PUT,DELETE calls to REST endpoints . src\app\services\todo.service.ts import { Injectable } from '@angular/core'; import { HttpClient, HttpHeaders } from '@angular/common/http'; import { Observable, of, throwError } from 'rxjs'; import { map, catchError, tap, retry } from 'rxjs/operators'; import { Todo } from './../domain/Todo'; @Injectable({ providedIn: 'root' }) export class TodoService { endpoint = 'http://localhost:8081/api'; constructor(private http: HttpClient) { } // Http Options httpOptions = { headers: new HttpHeaders({ 'Content-Type': 'application/json' }) } // To Get List Of Todos getTodoList(): Observable { return this.http.get(this.endpoint + '/todos') .pipe( retry(1), catchError(this.handleError) ); } // HttpClient API get() method => Fetch Todo getTodo(id): Observable { return this.http.get(this.endpoint + '/todos/' + id) .pipe( retry(1), catchError(this.handleError) ) } // HttpClient API post() method => Create Todo createTodo(todo): Observable { return this.http.post(this.endpoint + '/todo', JSON.stringify(todo), this.httpOptions) .pipe( retry(1), catchError(this.handleError) ) } // HttpClient API put() method => Update Todo updateTodo(id, todo): Observable { return this.http.put(this.endpoint + '/todo' , JSON.stringify(todo), this.httpOptions) .pipe( retry(1), catchError(this.handleError) ) } // HttpClient API delete() method => Delete Todo deleteTodo(id):Observable { console.log("Delete id "+ id); return this.http.delete(this.endpoint+ '/todo/' + id); } // Error handling handleError(error) { let errorMessage = ''; if (error.error instanceof ErrorEvent) { // Get client-side error errorMessage = error.error.message; } else { // Get server-side error errorMessage = `Error Code: ${error.status}\nMessage: ${error.message}`; } window.alert(errorMessage); return throwError(errorMessage); } } Step 8: Domain Layer - It contains model to hold the todo tasks data. export interface Todo { id?; name?; desc?; status?; } Step 9: Now we are ready to run the project - ng serve Step 10: Screenshots - Main page with data Grid

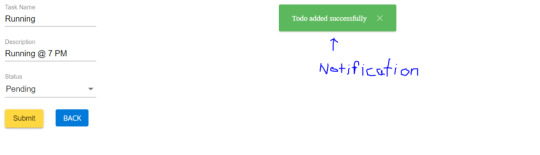
Add Task screen
Inline Task Editing screen

Deleting task -

Read the full article
0 notes